December 30, 2025
AI Dental Illustrations for Research: From Sketch to Publication

When I submitted my first paper to the Journal of Clinical Periodontology in 1993, I drew the figures by hand. Ink pen on tracing paper, then photocopied onto submission sheets. Thirty years later, AI dental illustrations let my PhD students turn rough sketches into publication-ready illustrations in minutes. The accuracy gap? Surprisingly small. But the time gap? That's where the revolution lives. Stay with me here—this matters for anyone trying to publish periodontal research visuals.
The bottleneck in periodontal research has never been the data. It's always been the figures. You can run the most elegant study, but if your dental research figures look like they were made in PowerPoint at 2 AM (because they were), reviewers notice. And they judge. I've been on both sides of that judgment.
That's why AI dental illustrations are changing how we communicate research. Not by replacing scientific rigor, but by removing the visual bottleneck that has slowed publication for decades.
"A research figure is the handshake between your data and the reviewer. Make it limp, and they'll question everything that follows."
Try the demo
Create your own dental diagram in seconds
Generate an AI illustration like the one in this article. No account required.
The Illustration Bottleneck in Periodontal Research
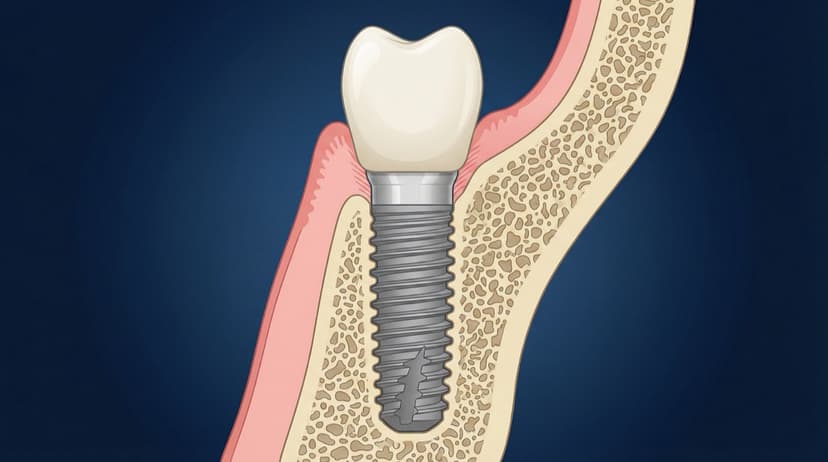
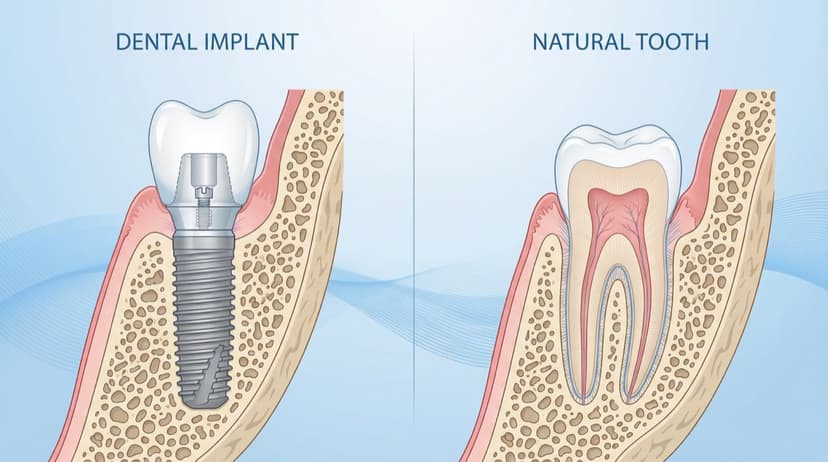
Research papers in implant dentistry depend on visual clarity. Cross-sections must show bone contours, soft tissue drape, and implant position with precision. For clinical guidance on achieving these anatomical relationships, see The Ideal Implant Position in the Aesthetic Zone. But most PhD students are not trained illustrators.
The usual workarounds are all terrible:
- Option 1: Buy stock art. Problem: It never matches your specific case.
- Option 2: Redraw in PowerPoint. Problem: It looks like you redrew it in PowerPoint. At 2 AM. After three coffees.
- Option 3: Hire a medical illustrator. Problem: $500-2,000 per figure, 2-4 week turnaround. Most PhD students don't have that budget or timeline.
- Option 4: Copy from another paper. Problem: Copyright issues, and you still don't have exactly what you need.
I've watched brilliant researchers delay publication for months because they couldn't get the figures right. That's not a minor inconvenience—that's a career bottleneck.

For a quick overview of implant anatomy diagrams you can reuse in manuscripts, see Dental Implant Diagram.
Why Most Research Figures Fail
Let me tell you what I see when I review manuscripts. The science is often good. The statistics are sound. But the figures fail in predictable ways:
- Inconsistent styling. Panel A uses one palette, Panel B uses another, and Panel C looks like it came from a different paper.
- Wrong anatomical proportions. The cortical bone is too thick. The implant threads are too shallow. The gingival contour doesn't match clinical reality.
- Poor labeling. Arrows pointing to nothing. Fonts that require a magnifying glass.
- No visual hierarchy. Everything has the same weight, so readers don't know where to look.
For foundational context on the anatomical structures that must be accurately represented, review Bone Remodeling After Tooth Extraction.
For evidence on how visuals improve comprehension and recall in healthcare communication, see Houts et al., 2006 and Kessels, 2003.
"The best figure is the one that makes the reviewer forget they're looking at a figure. They should see only the finding."
How AI Dental Illustrations Change the Research Workflow
Here's what changed for me when I started using AI medical illustration tools for periodontal research visuals. I describe the clinical intent, the AI generates a first draft, and I iterate with precision. Within 30 minutes, I have dental research figures that share the same palette, line weight, and anatomy—cohesive and reviewer-friendly.
For a deeper exploration of how AI fits into clinical visualization, see The Art of Dental Illustration.
From Rough Sketch to Publication-Ready Figure
Step 1: Start with your clinical intent
Before you touch any tool, answer this question: What is the ONE thing this figure must communicate? If your figure is trying to show implant position and soft tissue thickness and bone remodeling and prosthetic emergence profile, you need four figures. Each figure, one message.
Step 2: Describe in clinical language
AI dental illustrations work best when you describe what you see clinically, not what you want artistically. Use measurements and anatomy: buccal plate thickness, implant connection type, tissue contours. For anatomical accuracy on implant components, review Platform Switching: A Biological Concept.
Step 3: Iterate with precision
The first output won't be perfect. That's fine. The key is to give specific feedback: "Make the buccal plate thinner," or "Move the gingival margin coronally." Three to four rounds are usually enough.
Step 4: Export for publication
Export at 300 DPI minimum and match journal requirements. Use transparent PNGs if you'll add labels in your manuscript software. For guidance on visualizing bone defects and grafts in publication-ready illustrations, see How to Solve the Most Common Bone Defects With Guided Bone Regeneration.

Practical Tips for Journal-Quality Visuals
Anatomy must be accurate
- Cortical bone should read denser than trabecular bone.
- The periodontal ligament space is ~0.15-0.38 mm, not 2 mm.
- Implant threads should match real geometry, not generic spirals.
- Gingival attachment follows biological width (~3 mm from bone crest to sulcus bottom).
For zero bone loss protocols that depend on accurate visualization, see Zero Bone Loss Concepts by Prof. Tomas Linkevičius.
Consistency across all panels
- Use the same cross-section angle.
- Keep a single color palette for bone, soft tissue, and implant materials.
- Maintain the same line weights and labeling style.
Less is more
Remove anything that doesn't support your main message. No decorative elements. No unnecessary labels. Your dental journal figures should guide the eye straight to the finding.
Labels should be outside the anatomy
Use leader lines and keep labels off the structures. Overlapping labels is the fastest way to lose a reviewer.
Export at the right resolution
- Line art (diagrams): 600-1200 DPI
- Halftone (grayscale images): 300 DPI minimum
- Color figures: 300 DPI minimum
- File format: TIFF or high-quality PNG
The Ethical Question: Is AI-Generated Art Acceptable?
The short answer: yes, with disclosure. Most journals accept AI-generated figures as long as you disclose the use of AI tools in your methods or acknowledgments section. Check each journal's guidelines before submission.
- Don't fabricate data—illustrations should reflect real findings.
- Disclose AI use transparently.
- Verify accuracy with clinical expertise.
"AI doesn't replace your clinical judgment. It removes the friction between what you see in your mind and what appears on the page."
What matters ethically: AI is a tool, like Photoshop or Illustrator. The clinical accuracy and scientific integrity remain your responsibility.
Try the demo
Create your own dental diagram in seconds
Generate an AI illustration like the one in this article. No account required.
Conclusion
The gap between good research and good figures has held back too many papers for too long. AI dental illustrations don't solve the science—that's still on you. But they solve the bottleneck that turns a two-month revision into a six-month delay.
If your research depends on clear implant and periodontal visuals, you don't need to hire an agency or redraw the same figure five times. PerioSpot Studio brings AI dental illustrations into the research workflow so you can publish with confidence. Start with a free trial at PerioSpot Studio, then compare plans when you're ready to scale.
A publication-ready figure is one that disappears into the finding. When reviewers see only your science and not your struggle with illustration—that's when you know the figure worked.
Related Articles
Dental Implant Diagram: Anatomy, Parts, and Procedure Visuals
Free dental implant diagrams for lectures and patient education. Download transparent PNGs showing implant parts, placement procedure, and component anatomy.
Dental Patient Education Materials: Visual Resources for Modern Practices
Create professional dental patient education materials with AI. Free diagrams, illustrations, and visual tools for implants, GBR, and periodontal procedures.
Sinus Lift Diagram: Visual Guide to Procedure Steps and Anatomy
Professional sinus lift diagrams for dental lectures. Visual guide to lateral window approach, membrane elevation, and graft placement with free downloads.
Try the demo
Create your own dental diagram in seconds
Generate an AI illustration like the one in this article. No account required.